
Your Cart Total
{{price(cart.total || cart.subtotal_with_discount)}}
Add {{price(remainder)}} to qualify for free shipping*
You qualify for free shipping!*
Some items in your cart do not
qualify for free shipping.
Explore podcasts, videos, blogs, and webinars for inspiration and expert advice. Our extensive library is for everyone from beginners looking for a step-by-step guide through their first project or seasoned pros seeking fresh ideas and inspiration. We cover the topics you care about like technical tips and FAQs, interviews with industry stand-outs, and equipment comparisons and tours. Dive into our library and expand your knowledge today!
Go Back To ResourcesLaser and rotary engravers are similar in that they both engrave a variety of materials with amazing results. They are also different in numerous ways, including the mechanics of how they operate, the different results that can be achieved, and the applications to which each method is best suited.
Rotary engraving is the process of using a mechanical engraver that utilizes a motorized spindle and a cutting tool (bit) that rotates with the spindle, removing areas of the material being fabricated. Rotary engravers can engrave on most machinable bare metals including aluminum, brass, stainless steel, silver, gold, pewter, titanium and platinum, both coated or uncoated.
Another profitable area for rotary engraving businesses is ADA signage! When creating signs that adhere to the specific guidelines for ADA, rotary engravers offer a distinct advantage over lasers. In addition to cutting the 1/32” tactile letters, rotary engravers offer excellent control over the depth, size and shape of the Braille bead holes. Rotary Engraving can also be used with 2-ply engraving plastic to expose the contrasting core color.
Laser engraving is the process of a beam of light being reflected through a series of mirrors that points the beam down through a lens concentrating the light into heat at an exact point. This process ablates the surface of the material exposing either a contrasting color or leaving an etched mark in the material. Their extensive versatility and ease of use has enabled many engravers to branch out into new and unique markets. Substrates receptive to laser engraving include wood, acrylics, fabrics, paper, card stock and rubber, as well as most solid surface materials and stone.
Whether you are new to the industry or considering a business expansion, you will want to consider both laser and rotary engraving depending on the products and services best suited to your customer base. If you aren’t sure which technology is right for you, fill out this form here and an equipment sales representative will be in touch to help you with any questions.
For both laser and rotary engraving and cutting, vector-based images are preferred. These files, like SVG, DXF, or AI, are composed of paths and shapes, allowing for precise and detailed engraving and cutting, even when resized. Raster images (like JPEGs or PNGs) are made of pixels and can become blurry when enlarged or used for cutting, making them less ideal.
Vector Images: These images are defined by mathematical equations representing lines and shapes, rather than individual pixels. This allows for smooth edges and precise cuts, even when scaled to different sizes.
Raster Images: These images are composed of pixels, and when they are zoomed in, the individual pixels become visible, leading to a jagged or blurry appearance. Raster images are not ideal for cutting or engraving due to their pixelated nature.
Why Vector Formats are Preferred: Laser and rotary cutters work by following a defined path or outline. Vector formats provide these paths, making it possible to achieve precise cuts and engravings.
Examples of Vector Formats:
If you have any other questions on rotary or laser engraving, please contact a Customer Service Representative via the Chat icon located in the lower right hand corner of any page, via email at service@jpplus.com or by phone at 800-869-7800, Monday through Friday 8am to 8pm EST.
There are multiple types of lasers and laser manufacturers available on the market.
Some important questions to ask yourself are:
Let’s look at the main laser technologies available:
Fiber Laser: A solid-state laser that uses a fiber optic cable and rare-earth elements to create a laser beam. Fiber lasers excel at engraving metal and reflective materials.
CO2 Laser: A CO2 laser uses a high voltage power supply to charge gases in the laser tube to create infrared light. That light is focused in the tube through the laser output window, which then travels through three mirrors and finally through a focus lens. The more electric power that is pushed to the tube, the more powerful the laser beams. The process of generating the laser beam inside the laser tube creates heat, which is why all CO2 Lasers require a cooling method to maintain a reasonable operating temperature in the tube. The cooling functions for the laser tubes are typically built into the machine and are not necessary to add on to the system. Typical power outputs for CO2 Lasers range from 30w to more than 1000w.
Diode Laser: A diode laser is a device that uses semiconductor material to convert electricity into photons, or light. Depending on the material used in the semiconductor, the light emitted can take many forms including invisible UV light, visible light, and even near-infrared light. This light emitting technology is more commonly referred to as a “Light Emitting Diode”, or LED. The diodes used in laser engravers are extremely bright and powerful. Once the light is emitted from the diode, it is pushed through a lens where it is focused to a very narrow point. Sometimes there is more than one diode used to create focused light to engrave and cut. When searching for a diode laser you will see advertised wattages (which is a power measurement which describes how strong the emitted laser beam is). The light emitted from diode laser cutting or engraving is visible and extremely intense. Therefore, eye protection is mandatory when working around these lasers.
UV Laser marking machine: Operating at 355nm, UV lasers have a much shorter wavelength than the other laser technologies mentioned. Using a process termed “cold processing”, UV lasers shoot high-energy photons in the ultraviolet spectrum that break the chemical bonds in the material which causes the material to undergo non-thermal process damage. These are great for marking materials that cannot be exposed to heat.
Galvo Laser: Galvanometer (Galvo) is an electromechanical instrument that deflects a light beam by using a mirror, meaning that it has sensed an electric current. When it comes to lasers, Galvo systems use mirror technology to move the laser beam in different directions by rotating and adjusting mirror angles within the boundaries of a work area. Galvo lasers are ideal for using fast speed and intricate fine detailed marking and engraving.
For additional information on selecting a laser that is right for you, fill out this form here and an equipment sales representative will be in touch to help you with any questions.
When choosing a laser engraving machine, consider these key features: laser power and cutting depth, work area size, material compatibility, software compatibility and user interface, ventilation and air assist, safety features, support and warranty, and price. Understanding these factors will help you select the right machine for your needs and budget.
Here’s a more detailed breakdown of the features you should consider:
RF (Radio Frequency) CO2 laser tubes and glass CO2 laser tubes each have their own strengths and weaknesses. We compare the two laser tube types below:
Not all photos or artwork are going laser engrave well. The photos and artwork that will give the best result will contain a wide range of light to dark shades, interesting elements, and good definition of detail. To get the best results you will need to prepare the image, set the laser parameters, and then engrave on your substrate. Let’s go through the steps in detail below:
Tips for Best Results:
If you’re not sure which file format to use for your design, print, or web project, our resource guide is here to help! Below we break down the most common file types, such as PNG, JPEG, SVG, and PDF. Whether you’re working with vector graphics, high-resolution photos, or laser and print-ready files, this guide will help you understand file extensions, compression, transparency, scalability, and ideal use cases for each file type.
You will always want to verify what file types are compatible with the software and technology you are planning on utilizing, some equipment needs specific file types, while others can handle multiple different types of files.
While there are lots of fonts available, the most important decision starts with the basic choice between serif and sans serif font.
Serif fonts with their extra curves, tails, and written style lend themselves well to more formal, commemorative occasions such as weddings, graduations, etc. The small flourishes on these fonts can be tricky to engrave if the font is very small.
Sans Serif (sans meaning ‘without’) by contrast is a simpler style. These fonts display well on more modern, trendy items. They also engrave well at a smaller scale.
You may be asking yourself what materials can I use safely in my laser engraver? There are many different categories of materials that are safe for laser engraving and some materials you’ll want to avoid.
When selecting material, there are several factors to consider including what type of laser you have. Some of the most common types of lasers are Co2, diode and fiber, and each laser type has specific characteristics that make them more effective with certain materials.
Here are some examples of safe materials that work well with laser engraving:
CO2 Lasers:
Diode Lasers:
Fiber Lasers:
Materials to AVOID:
Materials to AVOID:
Utilize proper ventilation when laser engraving or cutting, with either a fume extractor or by venting to the outdoors. If planning on venting outdoors, ensure that you are getting enough dispersal of fumes by checking what the recommended Cubic Feet per Minute (CFM) is for your laser.
If you are unsure of the materials’ composition, you can reach out to the manufacturer for further information on composition and compatibility.
There are many choices when it comes to engraving materials and substrates. Most engraving shops offer more than one engraving service, so it’s good to have a reputable and knowledgeable supplier. Keep an eye out for the technology icons on our product pages at jpplus.com. Read our blog here to learn more about our technology icons. Each product has been expertly tested to help you understand the best fabrication methods.

LASER ENGRAVABLE ICON
Select from the lists below to see suggested power, speed & resolution settings for your equipment.
Note: These settings are a starting point, it is recommended to do a material engraving or material cutting test to verify the best settings with your specific laser.
Manufacturer
Model
Material
Results:
Please select a material to see the results and material tips.
Material Tips
{{tip}}
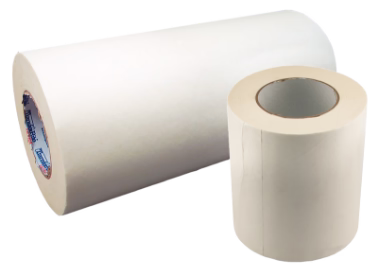
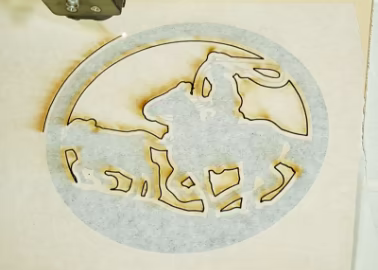
Paper masking offers several benefits in laser engraving, primarily protecting materials from burn marks and charring while ensuring clean, precise engravings. It’s a cost-effective and easy-to-use solution for achieving professional-looking results.
LiquaMASK, a liquid masking product used in laser engraving, offers several benefits:
Protection from Smoke and Scorching:
Versatility and Ease of Application:
Suitable for Various Laser Processes:
Improved Paint Filling Results:
Easy Cleanup:
Considerations:
Blazer Orange Laser Mask is a sandblast-able laser mask used for engraving designs, particularly on glass and crystal. Making it ideal for creating personalized gifts, promotional products, and corporate awards. It’s known for its durability, easy application, and residue-free removal.
Here’s a more detailed breakdown of Blazer Orange Laser Mask:
This tutorial guides you on using air assist on popular two-tone plastic sheet materials like Rowmark and IPI. You’ll learn how to use air assist to achieve cleaner, more precise cuts and engravings. Air assist is essential for reducing debris buildup and preventing flame flare-ups during laser jobs, resulting in sharper edges and professional-quality finishes. This video guides you through:
Whether you’re making signage, custom awards, or detailed projects, mastering air assist can significantly boost your laser cutter’s performance and efficiency.
When considering what kind of engraving sheet material to choose for your project, consider the type of engraving equipment you have available to work with. In today’s engraving and personalization industries, the CO2 laser engraver is the leading engraving and marking technology with other laser types such as diode and fiber lasers following close behind.
Secondary to lasers would be engraving machines that utilize “physical” engraving bits or tools, such as rotary engravers and CNC routers. Both lasers and engravers/CNC’s have different strengths and weaknesses, depending on the type of engraving that is needed. In a general sense, one major strength of laser engravers is that they can engrave high detail imagery while only needing to remove a very small amount of surface material to achieve the contrasting mark. They are also able to cut materials with impressive thicknesses, up to ¼” or even ½” or more in some cases.
One weakness of laser engravers may be that they can only engrave or cut a more limited variety of material types. This is where rotary and CNC machines can shine. Because rotary machines do not rely on laser radiation to vaporize materials, this allows them to utilize more material types than laser engravers. Rotary and CNC machines are able to fabricate many types of materials that cannot be done on a laser for safety reasons, or simply cannot produce quality engravings and cuts. The main limits to rotary style machines are the sizes and geometries of the bits or tools available for the machines.
When considering engraving material options, it is important to understand some of the fundamental differences between material types. JPPlus recommends Rowmark engravable sheet. When looking at the Rowmark engravable sheet lines, there are two basic types laserable and rotary. The laserable sheet materials are also rated for rotary engraving, while the rotary only materials are rated only for rotary engraving and not laser engraving.
Rowmark defines laserable materials as: Laserable (laser engraving)
Acrylic core materials with thin cap surfaces that can be easily engraved with minimal wattage at increased speeds. ABS materials are not recommended for lasering applications.
LASER ENGRAVABLE ICON
Rowmark defines rotary materials as: Rotary-Engravable (rotating carbide engraving)
This marking method uses a single or multiple fluted cutting tool which rotates through the work to remove material, leaving a trough of exposed core. As compared to diamond-drag, rotary engraving may result in deep cutting or the complete cutout of a letter or object. The cutter’s tip size determines the width of the cut. In most applications, the spindle micrometer setting controls the depth of cut. This process is suitable for most commercial and industrial work. Unlike diamond-drag, rotary engraving is the only means of engraving plastic materials with controlled depth.

ROTARY ENGRAVABLE ICON
Looking at the characteristics of laserable sheets vs rotary sheets, the sheet product lines that are rated as laserable usually have a thin cap layer (0.003-0.005” thickness). Some sheet types will have a laminated foil as the tip cap layer, while others will have a very thin modified acrylic layer. The majority of the laserable sheet materials will be made of modified impact acrylic or cast acrylic. These plastic material types are more suited and preferred for laser engraving applications.
Rotary engraving materials are less limited since they do not need to withstand the high temperatures associated with laser engraving. Common plastic materials for rotary engraving include acrylics such as modified impact and cast acrylics, ABS, polycarbonate, and more. Some rotary engraving sheet materials may combine more than one material type in their construction, such as aluminum composite panels (ACM) and wood plastic composites (WPC).
Material selection is one of the most important aspects of planning for your engraving projects. Choosing the best materials for the job is important not only for safety reasons but also for ensuring the best results possible for your projects and customers. Choosing the right materials for the job helps ensure long-lasting products and reduces mistakes, wasting time and money, and preventing material scrap.
For more information on how to choose the best materials for your needs, please visit jpplus.com or give us a call at 800-869-7800.
Laser Bonding is a marking process that produces permanent marks on a variety of surfaces including metals, glass, ceramic, and stone without damaging the surface. Typically performed with a CO2, fiber, Nd: YAG, or DPSS laser systems, laser bonding technology has enabled manufacturers to automate their marking operations.
It is the most robust technology that is being widely used to personalize or serialize countless physical items with logos, bar codes, labels, patterns, images, and much more.
Founded in the mid-1990s by Paul W. Harrison, laser bonding technology has come a long way in offering a reliable marking solution to laser owners and manufacturers. It differs from conventional marking methods such as laser engraving and etching in a way that it adds material to the surface instead of removing it.
So, whether it’s for product tracking, branding, coding, or adhering to the quality control standards, it all comes down to laser bonding technology.
The laser bonding process creates durable markings by using a coherent laser beam together with a laser bond additive material, which could either be a laser marking aerosol spray, ink, or any other product commercially available on the market.
When a laser system is used, it emits a high-energy laser beam that interacts with the additive marking agent to leave a solid, black mark. This laser-material interaction essentially produces localized heat around the small area of the material called the focal point.
Due to this laser-induced heating reaction, the marking agent absorbs the laser energy which results in its permanent addition to the substrate surface. This fusion is aided by a strong covalent bond between the two and the laser-bonded marks have shown to be as durable as the substrate itself.
Having said that, laser bonding is an additive process which is giving manufacturers and operators a new level of control in marking any part or component with ultimate precision, speed, and clarity.
It’s noteworthy that the laser-material interaction and the mark quality depend on two major factors: material composition and the laser settings. Choosing an efficient marking system may seem a challenge but laser bonding technology has made it possible to embrace high-quality marks.
This is primarily because it is compatible with all commercially available laser systems including CO2, Fiber, Nd: YAG, and DPSS. Moreover, these systems can be easily integrated into the production line, thereby simplifying the marking process for many industries such as medical, automotive, aerospace, decorative, electronics, etc.
1. What is the difference between CerMark, TherMark, and LaserBond 100?
All three products are similar in formulation and work with basically the same laser settings to produce permanent black marks; however, when first applied CerMark dries to a paint-like light tan color, TherMark dries to a powdery light gray color and LaserBond 100 dries to a powdery darker gray color.
2. Can LaserBond 100 be used on different substrate surfaces?
Yes, LaserBond 100 is an “All Purpose” formulation and can be used on a variety of substrates including glass, ceramic, stone, and metals such as stainless steel, brass, aluminum, copper, titanium, tin, nickel and many others.
3. I want to try LaserBond 100. Should I use aerosol spray or liquid ink?
It is recommended that you start with the aerosol spray for test and evaluation purposes. The aerosol spray cans are pre-mixed and ready to use which eliminates the need to dilute the Liquid Ink - you only need to concentrate on getting the correct coating thickness and laser settings as shown on the instruction sheet enclosed with each spray can. Once you’ve tried the aerosol and gotten some experience with spraying it and determining the correct laser parameters, you can switch to a foam or airbrush application of the Liquid Ink when you begin marking larger quantities. The Liquid Ink is concentrated and needs to be diluted with denatured alcohol. Please follow the instructions shown on the enclosed instruction sheet and product label. You’ll already be familiar with the proper coating thickness and it will be easy to switch if desired. There are considerable economic advantages for switching to the Liquid Ink when marking larger quantities, since a square inch of aerosol spray costs about $0.03, while a square inch of Liquid Ink costs $0.01 or less depending on the container size.
4. How do I apply LaserBond 100?
It is recommended that the aerosol spray be applied by holding the spray can approximately 6” – 8” from the surface and spraying directly onto it using a side-to-side motion. The Liquid Ink can also be applied by manually brushing it onto the surface using a foam brush or by spraying it using an airbrush or spray gun. Always be careful to ensure a thin, even and smooth coat is applied. Any variation in the coating thickness such as drips, runs or brush marks will translate into variations in the final appearance of the resulting mark. Spraying usually provides the best results when properly applied.
5. How long will the marks last? How tough are they?
Marks made with LaserBond 100 are permanent and generally considered to be as durable as the surface of the substrate material itself. Physical testing has shown them to be resistant to several common strong acids, bases, organic solvents and extreme heat or cold as well as exhibiting good salt spray resistance, scratch resistance and long-term UV exposure.
6. How do I know when I’ve sprayed the right amount LaserBond 100 material?
Hold the spray can or air brush 6” – 8” inches from the substrate surface. It is important that the LaserBond 100 is applied in a thin, even and smooth coating using a side-to-side motion. Applying LaserBond 100 may require a little practice to obtain the correct coating thickness – which should be 0.001” - .002” (0.05mm) thick. A good exercise is to draw a line on white paper using a black marker and then spray only as much LaserBond 100 as is needed to make the line fade away and almost disappear.
7. What kind of laser do I need?
LaserBond 100 products can be used with all commercially available laser marking systems including CO2, Nd: YAG, DPSS and Fiber lasers.
8. Is LaserBond 100 dangerous or toxic?
No. Please carefully read the product label and SDS statement regarding application and worker safety.
Browse FAQ's and information for
Browse FAQ's and information by
Browse our
Our free resources are here to help you create confidently! You'll find everything from laser engraving ideas to sublimation heat press settings in our ever-expanding collection of blogs, how-to-videos, free artwork downloads, tech tips, and templates.
In addition to high-quality blanks, supplies, and equipment, our free resources help you work faster, learn new techniques, and take your personalization or signage business to the next level! Whether you're looking for tips and tricks for sublimation, laser engraving, rotary engraving, UV printing, DTF, or DTG - you've come to the right place!
Our video library offers creators and sign-makers quick tutorials, expert product demonstrations, and creative inspiration for laser engraving and more. Explore topics like:
New videos are uploaded regularly to keep up with new trends and technologies.
Design with confidence using our downloadable product templates and material-specific tech tips. Each resource includes:
Perfect for sublimation blanks, laserable materials, UV-print ready items, and more, these free downloads help reduce waste and improve production speed.
Looking for creative ideas for your laser engraver, UV-printer, or more? Our blog and featured project pages give you real-world applications and tips for:
Additional resources include:
Follow Us On
Social Media
for the latest trending products,
inspiration, tips, tricks and more!
@johnsonplasticsplus