Explore podcasts, videos, blogs, and webinars for inspiration and expert advice. Our extensive library is for everyone from beginners looking for a step-by-step guide through their first project or seasoned pros seeking fresh ideas and inspiration. We cover the topics you care about like technical tips and FAQs, interviews with industry stand-outs, and equipment comparisons and tours. Dive into our library and expand your knowledge today!
Adding new technology to your business is an exciting way to grow and boost profitability. With so many options available, choosing the right solution can be challenging, but JPPlus is here to help! Our team is here to guide you toward the best technology to fit your needs and goals. Fill out this form if you’re looking for more guidance from the JPPlus team.
Sublimation: Adding sublimation capabilities offers a fast, affordable, and high-margin way to broaden your product offerings into the world of personalized items. With just a sublimation printer, heat press, transfer paper, and suitable blanks, you can start producing vibrant, durable items, from apparel and drinkware to signs and home décor, without heavy upfront investment. Sublimated designs are infused into the material, so they resist fading, cracking, or peeling, appealing to customers who want lasting quality. Introducing sublimation also opens up customization opportunities, helping to attract new customers and deepen your brand’s repertoire. View our sublimation buyer’s guide.
Laser engraving: Laser engraving combines durability, precision, and creative flexibility in ways that can boost your brand, your product offering, and your bottom line. It delivers permanent, fade-resistant markings that are great for signage, awards, tags, or gifts that need to last. The technology works across many materials like wood, metal, leather, glass, and acrylic, so you can offer a wider range of products without needing entirely new tools. It also allows for very fine detail, including small text and complex designs, that raises perceived value. Plus, modern desktop laser engravers are becoming more compact and affordable, making them accessible even for smaller shops or startups. View our laser engraving buyer’s guide.
Rotary engraving: Rotary engraving is an excellent choice for your business because it produces deep, long-lasting markings that are ideal for heavy-use and industrial applications. It physically removes material rather than just changing the surface, making it better suited for durable items like metal tags, control panels, machinery parts, and signage meant to withstand wear or harsh conditions. Rotary engraving also gives you great flexibility in terms of material you can customize, such as plastics, acrylics, and woods, and lets you control depth, texture, and finish. It’s well-suited for applications where tactile or high-contrast text/grooves are needed (e.g. ADA signage), offering reliability and ruggedness that customers appreciate. View our rotary engraving buyer’s guide.
Toner heat transfer: Toner heat transfer uses a laser printer and heat press to apply custom, full-color graphics onto fabrics or hard goods without the need for coatings or special pretreatments. It works on both light and dark materials, including cotton, blends, and some synthetics. The process is simple and efficient, making it great for short-run, on-demand apparel or promotional products. It’s a strong fit for businesses seeking flexibility and low maintenance with professional-quality output. View our toner heat transfer buyer’s guide.
UV-LED printing: UV-LED printing uses ultraviolet light to instantly cure specially formulated inks directly onto flat or textured surfaces. This allows for custom full-color printing on almost any material, including wood, glass, metal, plastic, leather, and acrylic. It can even print raised textures and 3D effects for added dimension. UV printing is ideal for those looking to expand into high-end signage, promotional items, or custom décor, offering vibrant color and excellent durability. View our UV-LED printing buyer’s guide.
Direct-to-film (DTF) printing: DTF printing prints full-color designs onto a transfer film, which is then heat-pressed onto a wide range of fabrics. Unlike other methods, DTF isn’t limited by fabric type, you can decorate cotton, polyester, blends, or performance materials with ease. The results are soft, flexible, and long-lasting, even after multiple washes. It’s a great solution for apparel decorators who want to produce vivid designs quickly and efficiently with minimal prep work. View our DTF buyer’s guide.
Direct-to-garment (DTG) printing: DTG printing uses finely tuned directional spraying of water-based textile ink directly onto cotton or cotton-blend garments, creating high-resolution, soft-to-the-touch designs. It excels at capturing fine details, gradients, and photographic images. DTG is ideal for small runs or on-demand printing, as you can print one shirt at a time without screens or setup. It’s perfect for businesses that focus on custom apparel, online orders, or niche designs. View our DTG buyer’s guide.
Print & cut: Print & cut combines digital printing with precise contour cutting, letting you produce full-color graphics, decals, heat transfers, and signage all from one workflow. It’s ideal for vinyl graphics, labels, and custom apparel transfers. Businesses that want to handle multiple product types, including stickers and t-shirt graphics, benefit from its flexibility, fast turnaround, and professional finish. View our print and cut buyer’s guide.
Absolutely! There are several ways to explore our equipment before you buy:
Visit us at an industry trade show where we showcase our most popular machines.
Follow our social media accounts to join live events.
View our videos page, where we have equipment overviews, how-to's and more.
Fill out this form to connect with an equipment sales representative.
Our Advanced Support Team (AST) is ready to assist you with your equipment install. To connect with AST on an install, please set up an appointment here.
We provide free equipment support for the lifetime of your machine (some exclusions apply). Our Advanced Support Team (AST) is available to help troubleshoot common printer and equipment issues. Depending on the model, certain manufacturers may also offer extended service plans that include on-site repairs by the manufacturer. You can access equipment guides or schedule an appointment with our team for personalized assistance.
If you’re not sure which file format to use for your design, print, or web project, our resource guide is here to help! Below we break down the most common file types, such as PNG, JPEG, SVG, and PDF. Whether you’re working with vector graphics, high-resolution photos, or laser and print-ready files, this guide will help you understand file extensions, compression, transparency, scalability, and ideal use cases for each file type.
SVG: A Scalable Vector Graphics file, or SVG, is a file type for graphics, known for its ability to scale without losing quality. SVGs are defined by mathematical equations that describe shapes, lines, and curves, rather than pixels. SVGs are excellent for logos, icons, and vectored artwork. You can use them with many software types from printing, website design, to laser engraving. They are not suitable for use with photographs.
PDF: Portable Document Format files, or PDFs, are a common and versatile file format used in graphic design and printing due to their ability to preserve design integrity, maintain color accuracy, and ensure consistent display across different platforms. PDFs ensure that the design looks the same on different computers and devices, regardless of the software or fonts used to create it. PDFs can handle complex designs, making them suitable for a wide range of applications. PDFs can maintain color accuracy, which is essential for clients who rely on precise color reproduction in their designs. PDFs are often optimized for printing, allowing designers to embed color profiles, manage separations, and control output settings for high-quality results.
PNG: Portable Network Graphics file, or PNG, is a raster image file type. It’s known for its ability to handle images with transparent or semi-transparent backgrounds, making it a popular choice for web graphics, logos, and icons. By utilizing lossless compression, PNGs can compress images without losing any image data, preserving quality even after multiple edits. They support transparency, which is crucial for layered images and web design. PNGs primarily run RGB color profiles. The PNG is a universally supported format, with excellent compatibility across different browsers and image editing software.
JPEG: A Joint Photographic Experts Group file, or JPEG (JPG), is a raster image format known for its lossy compression, which helps reduce file sizes for easier sharing and storage. JPEG files achieve smaller file sizes by discarding some image data during compression. This process means that some image quality is sacrificed to reduce file size. These files also do not support transparency, meaning they are not suitable for images where parts of the image need to be seen through. These files can also contain metadata, such as information about the camera settings used to capture the image, the date and time it was taken, and even location data. JPEGs are versatile and widely used for various purposes, including digital photography, and social media sharing.
You will always want to verify what file types are compatible with the software and technology you use, as some some equipment needs specific file types, while others can handle multiple different types of files.
Are you just starting out or building yourself a more robust workspace? Below is a look at factors to consider when creating the optimal workspace for your business.
Environmental Factors to Consider:
Temperature: Generally, temperatures between 59°F and 77°F (15°C and 25°C) are recommended to store and produce prints, transfers, and products.
Humidity: A relative humidity level between 35-55% is recommended. If needed, a dehumidifier can be helpful in humid environments.
Substrates and Inks: Different materials and different inks may have specific temperature and humidity recommendations. Refer to the manufacturer’s guidelines for your specific paper, films, ink, and substrates.
Transfer Papers and films: Store transfer paper or film in a sealed plastic bag or airtight container to prevent moisture absorption.
Substrates: Pre-press fabric substrates to remove wrinkles and moisture before sublimation. Some hard surfaces can attract and retain moisture; you can pre-press or hover the heat press over the substrate to remove excess moisture.
Keeping your workspace at a stable temperature and humidity will ensure that your products are of consistent quality, reducing waste and wear and tear on your machines.
Additional Factors to Consider:
Workspace: Having dedicated space for laptops, computers, as well as an assembly workspace is important. Keep counters clear of debris and ensure that your workspace can be easily wiped down and cleaned in case of spills.
Storage: Consider your storage needs for ink, papers, films, spare parts and important tools. You will also want to have storage for substrates, pre-made blanks, and shipping materials.
Fire Safety: Store any flammable products used in cleaning or production in a fire cabinet and keep a fire extinguisher on hand.
Ventilation: Ideally, your workspace will have good ventilation to reduce any odors associated with fabrication processes. For certain products and processes, you may need additional ventilation or air filtration.
Power: Depending on your machine’s power needs, you may need to have multiple circuits in your workspace. Work with a licensed electrician to verify your workspace can handle the electrical load.
Internet: Most printers and engraving machines work best when connected via ethernet or USB to your computer. Make sure you have connection capacity to support the number of machines you want to operate.
Trash: Reduce the risk of fire by practicing good trash management, remove extra waste often, especially if working with any paints, stains or other solvents.
Growth: As your business grows, you may need to expand or even rework your space. Investing in tables on wheels and flexible storage will help you as your business needs change and grow.
When it comes to utilizing different computer systems in printing and production, there are some important factors to consider when selecting the right product for your business.
Cost-Effectiveness: You can often find a powerful Windows-based PC at a lower price compared to a comparable Mac.
Compatibility: Some software programs only operate on Windows operating systems, so always check system requirements before purchasing a printer.
Storage: Some printer programs barely take up any space on a computer, while others are huge and take up a ton of space. Ensuring that you have enough storage space for the printing program, design programs and file storage is important.
Color Management: While the core principles of color management are the same for both Macs and PCs, the workflow is impacted by differences in ICC profile handling and the operating system’s color engine. These differences can lead to variations in printed colors, even when using the same printer.
Features
MAC
PC
Impact on Printing
ICC Profiles
ColorSync: macOS uses the ColorSync utility to manage color profiles. However, in recent years, Apple has changed how ColorSync interacts with printer drivers, making it difficult for users to select custom ICC profiles from within certain application print menus.
Standardized Driver Access: Windows provides a more straightforward method for accessing and selecting ICC profiles within the printer’s preferences.
On Macs, you may need to use specific design software (like Adobe Illustrator) that offers more robust color management options, bypassing the macOS print dialog’s limitations. PC users generally have a simpler workflow and more options on how to print.
Built-In Color Engine
ColorSync: As an integrated component of macOS, ColorSync is a powerful color management tool that aims for consistency across all applications. However, its behavior can sometimes conflict with third-party application settings, leading to unexpected color shifts.
WCS/ICM: The Windows Color System (WCS) or Image Color Management (ICM) manages color profiles. It is generally less integrated at the OS level than ColorSync and relies more heavily on the print application and driver to handle color conversions.
Differences between the operating system’s color engine and the application’s color engine can create color variations. The issue can be more complex to troubleshoot on a Mac.
Printer Driver
Printer manufacturers create separate drivers for macOS.
Printer drivers are developed specifically for Windows operating system.
Different drivers on each platform can lead to slight variations in color output, even when using the same printer and print settings. These discrepancies are often subtle but noticeable in professional or color-critical workflows.
To minimize the impact of operating system differences, follow a consistent color management workflow on either platform:
Use professional software: Use color-managed software like Adobe Photoshop or Affinity Designer for printing. These applications provide options for selecting and assigning ICC profiles and overriding the operating system’s color handling.
Disable automatic color correction: Always turn off any automatic color adjustments in both your design software and the printer driver. Let the ICC profile handle the color conversion.
Use the correct color space: For the most consistent and accurate results, work in a consistent color space like RGB or CMYK when creating your designs.
Calibrate your monitor: A color-calibrated monitor is necessary to ensure the colors you see on your screen accurately reflect the colors in your design file. This is especially vital if you use TV screens for monitors.
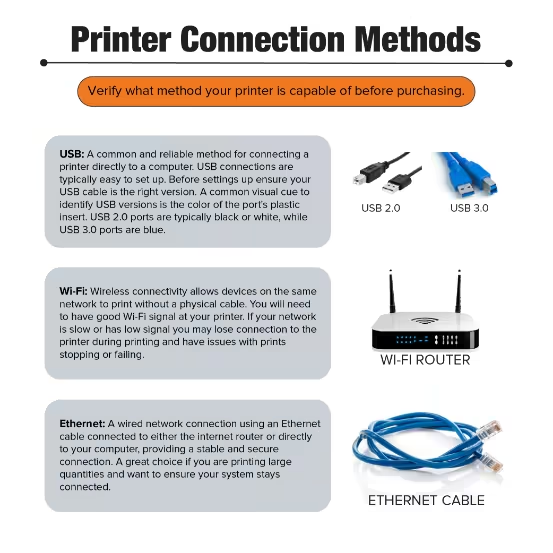
Printers can typically connect to your computer or network using one of three main methods: USB, Wi-Fi, or Ethernet. Each method offers different advantages depending on your setup and printing needs. Reference the guide below for more information or download guide here.
While connecting your printer via Wi-Fi does not typically impact print quality, a weak or unstable Wi-Fi connection can lead to issues in producing prints.
Weak or unstable Wi-Fi signal: A poor connection will result in data loss during transmission, leading to missing parts of the print, or very slow printing.
Network congestion: A busy network can cause slower data transfer, potentially leading to pauses in printing.
To ensure good print quality with your printer connected using Wi-Fi:
Optimize your network: Ensure a strong, stable Wi-Fi signal for the printer.
Check printer settings: Make sure the printer’s resolution, ink levels, and other settings are appropriate for the desired output.
for the latest trending products, inspiration, tips, tricks and more!
@johnsonplasticsplus
Free Personalization Resources to Help You Create Like a Pro
Our free resources are here to help you create confidently! You'll find everything from laser engraving ideas to sublimation heat press settings in our ever-expanding collection of blogs, how-to-videos, free artwork downloads, tech tips, and templates.
In addition to high-quality blanks, supplies, and equipment, our free resources help you work faster, learn new techniques, and take your personalization or signage business to the next level! Whether you're looking for tips and tricks for sublimation, laser engraving, rotary engraving, UV printing, DTF, or DTG - you've come to the right place!
Educational Videos
Our video library offers creators and sign-makers quick tutorials, expert product demonstrations, and creative inspiration for laser engraving and more. Explore topics like:
Looking for creative ideas for your laser engraver, UV-printer, or more? Our blog and featured project pages give you real-world applications and tips for:

Follow Us On
Social Media
for the latest trending products,
inspiration, tips, tricks and more!
@johnsonplasticsplus